
Developing a lean layout is as much of an art as it is a science. Therefore, it’s essential to engage your employees throughout the design and implementation process as described in the Part 1 article. That said, be cognizant not to develop plans exclusively based on brainstorming sessions or kaizen events. While layout design is not an exact science, adhering to fundamental principles and guidelines can lead to a lean and effective storeroom layout.
In Part 1 of this article, we covered the first five steps that are frequently overlooked but vital for the successful design of a lean storeroom layout. The five steps are: 1. Recruit a Winning Team, 2. Be S.M.A.R.T. About It, 3. Get with the (5S) Program, 4. “Stay in Stock”, and 5. Be Prepared for a Flash Flood.
In part 2 we’ll examine the remaining five steps: 6. You’ve Got to Be Kitting, 7. Location, Location, Location, 8. Be Well “Equipped”, 9. The Best Laid (Out) Plans, and 10. The Devil is in the Detailed Layout.
6. You’ve Got to Be Kitting
Kitting involves the collection of all the parts needed for one product (i.e. product kit) or a predetermined number of subassemblies in one work cell (i.e. cell kit) from the storeroom and delivering the kit to the point-of-use at the right time, in the right quantity and sequence. Components for a planned job appear on a kit list. The parts are picked and kitted. Once the job is scheduled or a kanban signal is received, the kits are transported to the point-of-use. After the kit is emptied, it’s returned to the storeroom area.
Most job shop environments are ideally suited for material kitting processes because of the great variety of parts involved (i.e. usually too much variety to present at the point-of-use). Since kitting retires production operators from the part picking business, they spend less time walking and searching for parts so their value-added productivity increases, there’s fewer part selection errors, and their learning curve is shortened. Eliminating point-of-use material stocking reduces floorspace requirements and clutter and promotes good visual management. In addition, kitting also supports “one-piece-flow.”
Consolidating parts for a particular product into a kit can also greatly enhance inventory control by eliminating situations where material gets “lost in the shuffle;” when there’s too many places where parts can be hidden throughout the shop. An all too familiar scenario which I often encounter at companies who don’t have a properly designed storeroom and/or kitting process is employees (including the president) spend an exorbitant amount of time searching for MIA (missing in actions) parts. For example, when material requiring special processing (such as electroplating) is sent to an outside contract manufacturer and then returned to the shop, it gets buried in a dark corner. What inevitably happens is the “out of sight, out of mind” syndrome ensues and when it’s time to assemble the product, there’s a massive search party undertaken to hunt down the missing stuff. Make no mistake, a well-designed storeroom and kitting system will make it much easier to locate and identify items within your shop.
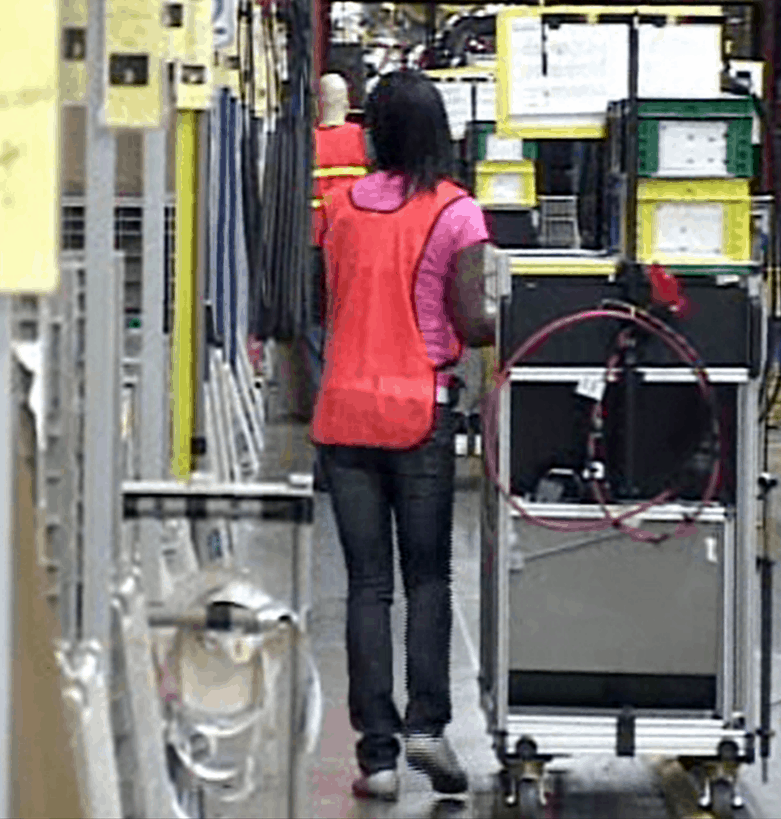
The stockroom must be efficiently and ergonomically laid out to support the building of kits. That includes properly sizing aisles to accommodate both the storeroom operator and the kit cart (when applicable) and allocating sufficient space to stage both full and empty kits. The storeroom, kitting system, and kit presentation at the workstation must be engineered as an integrated system in order for it to function as a well-oiled machine. Figure 1 shows an example of a kit build process.
Figure 1 – Example of a Kit Build Process
7. Location, Location, Location
The number one rule in real estate is location, location, location. A home situated in a prime spot such as a lake front is much more valuable than one adjacent to a freeway. Similarly, the location of your storeroom in relationship to other departments and activity areas will have a profound impact on the performance of your overall operations. Just because you happen to have open space somewhere in your shop doesn’t mean it’s a good spot for the storeroom. It interacts with other departments in the shop. For example, if material flows from the receiving dock to the storeroom and from the storeroom to the assembly cells, ask yourself: do we have wasted transportation because the storeroom is tucked away in a far-away corner of the shop? Perhaps the storeroom operator is also in charge of shipping and receiving activities. Do we have the waste of walking because we have a poorly designed floorplan? What impact does this have on the costs and efficiency of production?
The shop layout should be planned rather than departments haphazardly placed wherever there happens to be space available. To assure your rearrangement fully integrates the facilities and operations, a long-range factory master plan must be developed. This is usually the most critical level of planning because it will have the greatest impact on how well your operations addresses the “seven wastes” (Figure 2) and achieves its objectives. This is best accomplished by creating a macro-layout of your shop according to your future state value stream maps. Each conceptual block layout will have pros and cons that must be evaluated so an informed decision can be made on the best option for your particular situation. While it’s beyond the scope of this article to delve into the nuts and bolts of how to develop this plan, suffice it to say, it requires a careful analysis of both flow and nonflow factors (e.g. maintenance, tool/dies, supervision, safety considerations, environmental issues, etc.). In my experience, the optimum location for the storeroom is typically in close proximity to the receiving docks.
Figure 2 – Seven Types of Waste (Muda)

8. Be Well – “Equipped”
If the only storage devices you have are pallet racks, you tend to see everything as a pallet load. In other words, you store everything including individual cartons, totes and small packages in pallet racks, which are often set at a standard spacing throughout the storeroom, and end up with a lot of wasted space. Not very lean, but I see it all the time; which is surprising given the scarcity of storage space available in many job shops.
Selecting the right equipment not only affects space utilization, but it also impacts response time and productivity. For example, by displaying a wide variety of part numbers on the pick face, you’ll increase pick density and thus reduce the amount of travel per pick, resulting in more picks per hour.
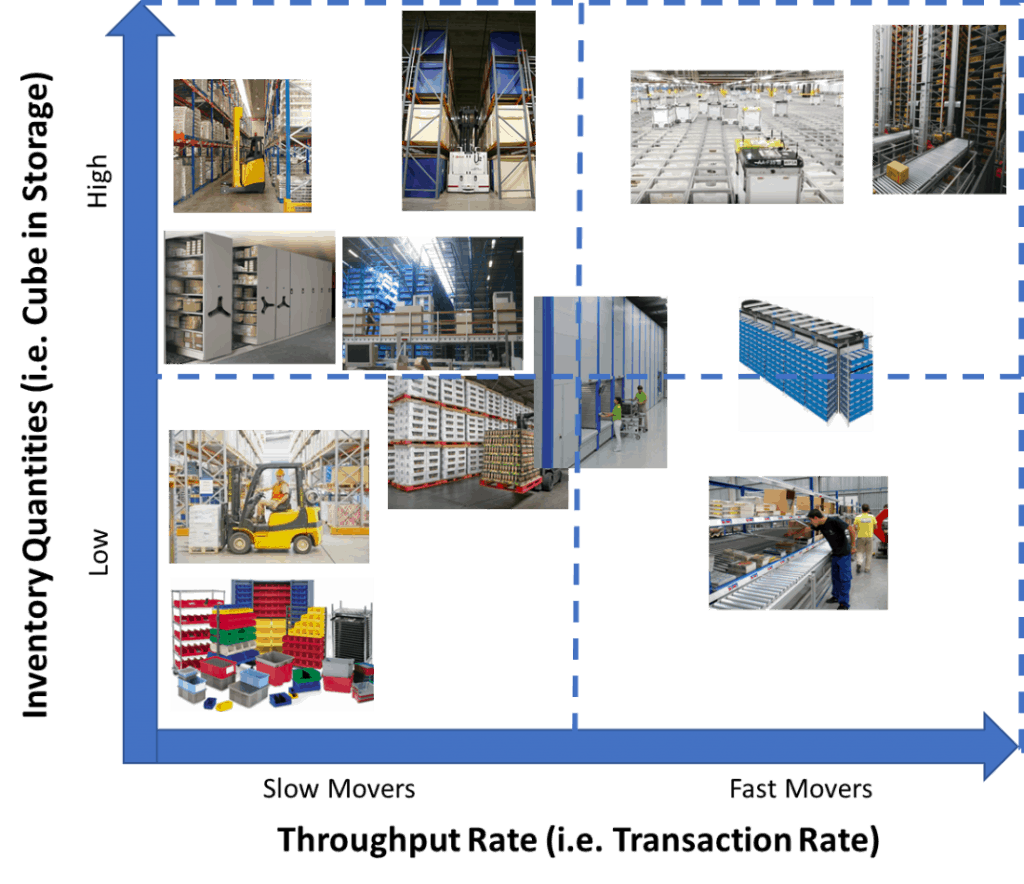
So, what’s the best storage method for your stockroom? While there’s no one-size-fits-all approach to equipment selection, there are some general guidelines that can greatly contribute to a lean storeroom as shown in Figure 3. It will depend on many variables including the amount, size, shape, weight, type, turnover and security needs of inventory, as well as ergonomic and environmental considerations (e.g. temperature, humidity, dust and static electricity) and last but certainly not least budgetary constraints. Each storage method has distinct pluses and minuses and the appropriate selection decision involves tradeoffs – one being between picking productivity and space utilization. Methods that provide dense storage typically increase travel distance and/or limit pick accessibility, resulting in lower productivity. Whereas techniques that provide for efficient picking, compromise storage density. For example, narrow aisle high bay pallet racking (pick from pallet) provides relatively dense storage at the expense of lower picking efficiency in comparison to carton flow racks.
In many situations the tradeoff can be minimized with automation (e.g. vertical storage modules, carousels, and mini-load). However, automation comes with a price tag, increases rigidity in the floorplan, and is overkill for many job shop applications.
As cited in the Part 1 article, the nature of the high-mix, low-volume (HMLV) Job Shop environment dictates the need to store a wide assortment parts in small quantities. Storing slow-moving, low cube items in bin shelving and modular drawers will generally provide a good balance between picker productivity and storage density as shown in the lower left quadrant in Figure 3. Depending on your particular requirements, an efficient storeroom could consist of a combination of modular drawers, rotating shelves/drawers, static shelving, racks and floor stacking integrated with a kit building process.
Figure 3 – Storage Equipment Selection
8. The Best Laid (Out) Plans
A well-laid
out storeroom will effectively utilize space, streamline flow and facilitate
high labor productivity, minimize errors, and maximize customer service levels,
avoid inventory damage and aging, and enhance safety and ergonomics.
Unfortunately, there’s no such thing as a perfect solution. There’s always a
trade-off among the competing objectives. Therefore, it’s a good idea to
develop alternative conceptual plans. In this phase your team should be
prepared to “think outside the box” and generate the “ideal” rearrangement
alternative first. Then work toward a practical layout solution, while
deviating as little as possible from the ideal. Although you may have
considered many options, two or three viable storeroom layouts will generally
suffice.
There are numerous factors to consider when designing your storeroom layout. Here’s a few of the big hitters:
- Maximize use of building clear height (subject to the height of lowest hanging object: truss, sprinklers, lights, heaters, fans, pipes, and other overhead obstructions.) while maintaining safe stacking heights (limited by floor loading, stability and crushability of unit loads, and government codes and standards). The National Fire Protection Association (NFPA) 13, a design standard for the installation of sprinkler systems, generally requires a minimum 18 inches overhead clearance from the top of storage to the sprinklers (and not less than 36 inches where rubber tires are stored).
- Facilitate first-in, first-out (FIFO) stock rotation via FIFO storage lanes; where inventory quantities justify them.
- Minimize honeycombing by storing items where the available storage space best matches the required depth and height for the amount of inventory to be stored.
- Design aisles to be straight, directed so the majority of stock is stored along the length of the storeroom, avoid building columns, and not be located along a wall unless it contains an entrance/exit.
- Employ separate aisles for storage and retrieval whenever possible so that restocking function doesn’t interfere with picking activity (i.e. restock from the back).
- Provide at least 36-inch-wide aisles where manual carts are used (e.g. shelving storage) and expanded to twice the width of the cart plus 18 to 24 inches where passing and/or two-way traffic is required. Allow for a minimum 60-inch-wide aisles where pallet jacks and manual platform trucks are used (assuming one-way traffic). Plan for 10 to 13-foot-wide aisles where conventional counterbalanced forklift trucks are operating (depending on the dimensions of the unit load and forklift). Note that in pallet rack aisles, if your pallets overhang on the rack beam, you must measure from pallet to pallet to achieve the proper aisle width.
- For rack storage systems, maintain a minimum of 6-inch clearance between adjacent unit loads and at rack uprights to comply with NFPA 13. This allows reasonable passage of sprinkler water down through the racking and better suppress a fire within the building.
- Pallet loads with limited ability to stack (such as those containing crushable items) are good candidates for storing in racks. For instance, if you are limited to stacking pallet loads one to two high, using conventional pallet racking three or more levels high, instead of floor stacking, can drastically reduce space requirements of your storeroom.
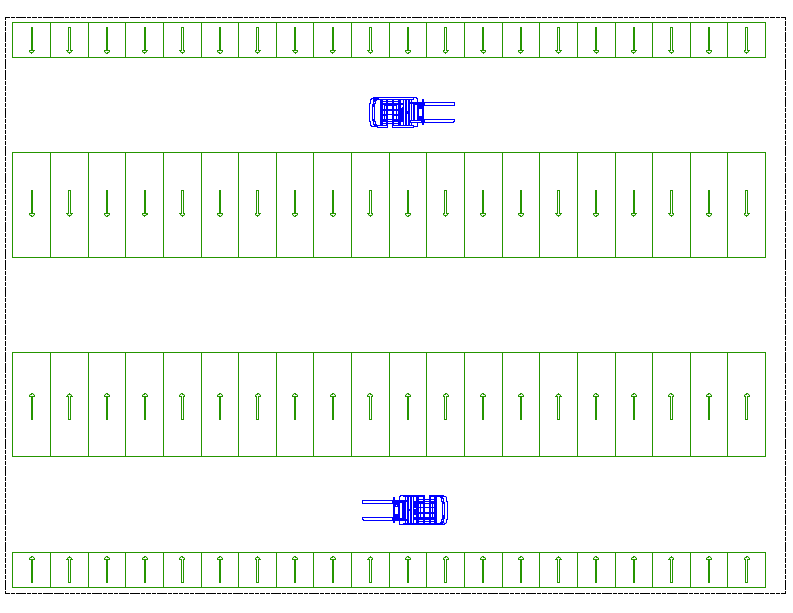
Figure 4 – Typical Bulk Storage Layout
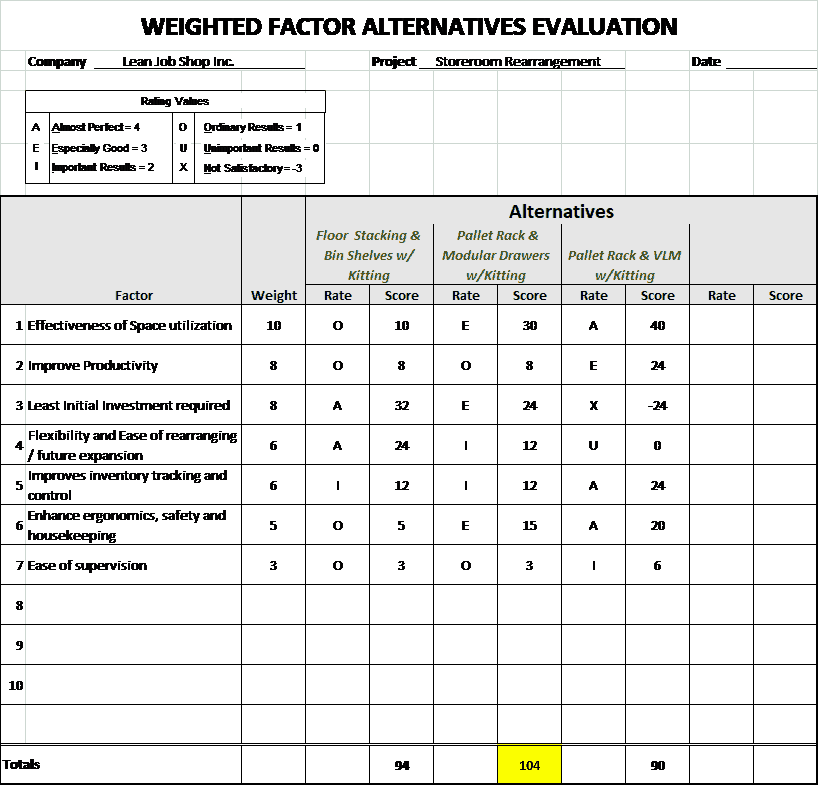
Now that you have multiple alternatives that can work, the job at hand is to select the option which is most suitable for your shop, both short and long term. To do this you’ll want to evaluate the alternatives in terms of cost comparisons and the SMART goals and criteria established in step 2. Only by performing a formal impartial evaluation can we “flush out” the best solution for your particular operation. Among the techniques used to evaluate alternative plans is listing the pros and cons and weighted-factor comparison. The easiest way to make a decision is to list the pros and cons of each alternative. However, this simplified approach falls short of providing a balanced and objective evaluation since it doesn’t get into the nitty-gritty of the relative importance of each factor. A better method is a weighted-factor analysis where you assign a weight value to each factor based on their degrees of importance, rate each layout against the factor, multiply the rating with the weight and total the weighted score for each alternative. The top scoring alternative is most likely the best compromise. This procedure gets your entire team into the act and helps to avoid personal agendas and politics that would otherwise creep into the process. Once you’ve carefully vetted each alternative, you’ll be in the driver’s seat to obtain the necessary approval for your teams preferred solution prior to proceeding with the detailed plan.
Figure 5 – Weighted-Factor Comparison
10. The Devil is in the Detailed Layout
Now that you have a preferred solution in principle, it’s time to make it real by detailing the arrangement of all equipment and features and fine tuning as necessary. Assuming you’ve done due diligence in the previous steps, few complications will arise.
If you’re not using a standard layering convention in your CAD file, you should consider it. It will help keep your drawings well organized, and also facilitate the sharing of data between the different disciplines. As a minimum, you’ll want to include the following layers in your CAD file:
- Building Layer – Permanent walls, columns, doors, pits, safety guardrail, offices, restrooms, and anything considered a monument.
- Material Handling Layer – Material handling and storage equipment including carousels, carts, catwalks, conveyors, containers, cranes, designated floor storage, dollys, forklifts, mezzanines, modular drawers and cabinets, order pickers, racks, shelves, tuggers/trailers and VLM’s.
- Aisle Layer – Pedestrian, vehicular and maintenance/service aisles.
- Utility Layer – Electrical, fire protection, HVAC, sewage, etc.
Next, create templates of the equipment and furniture as appropriate and save as blocks or cells within your CAD system. Templates can be drawn from scratch or downloaded from any number of websites, many of which are free to download, depending on your CAD software.
Now that you’ve prepared the necessary layers and templates, place all permanent obstacles on the micro-layout including columns, walls, doors, stairs, ladders, elevators, bathrooms and monuments, if not already on your drawing. Locate various types of storage and assign materials to storage locations. Aisles within and around the storeroom should be included as appropriate. Clearly mark fire equipment, electrical control panels (including safety envelopes), drinking fountains, eye wash stations/showers, desks, computer terminals, vending areas, team rooms, offices, and required access on layout.
As the details are drawn-in, don’t be surprised if some adjustments are necessary to your preferred conceptual layout for such things as properly sized aisles, maintenance access space for servicing equipment, and free door swings. For example, the NFPA 70, National Electrical Code (NEC) requires a 3 to 5-foot-deep work space must be provided and maintained about all electrical equipment (e.g. depending on the voltage and other conditions for electrical panels, transformers, etc.) to permit safe operation and maintenance of the equipment. While many of these details may not be explicitly considered during the concept phase, they must be included at this stage of the game (i.e. in the micro-layout). Prior concept plans are only on paper and can be fine-tuned within reason as the micro-layout is designed.
Finally, include a north arrow to orient users and add a title block displaying the company name, project title, drawing scale, date, and name of the layout planner. Be sure the layout is drawn to scale and printed to a scale typically of 1/8” = 1’-0” or ¼” = 1’-0”
The completed detailed layout can now be used as a basis for bid documents, when equipment procurement is warranted, and guide the implementation.
Figure 6 – 2D Storeroom Layout
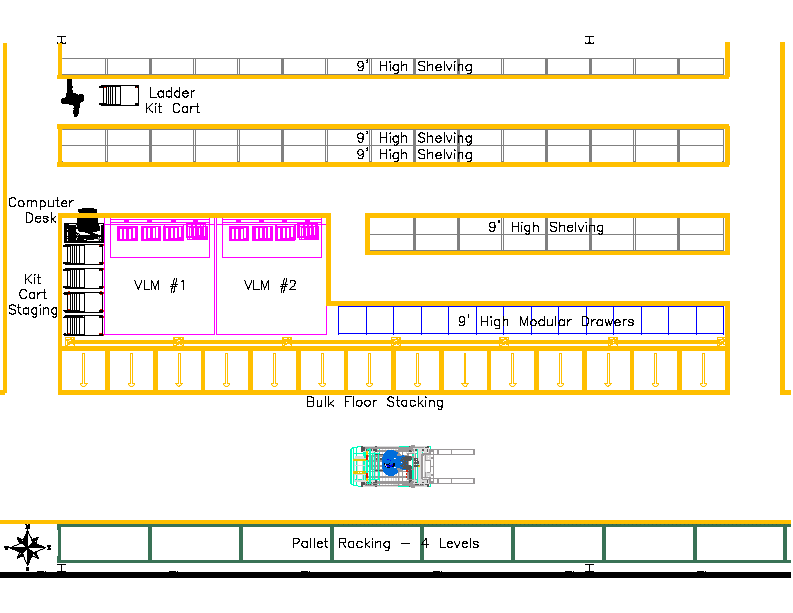
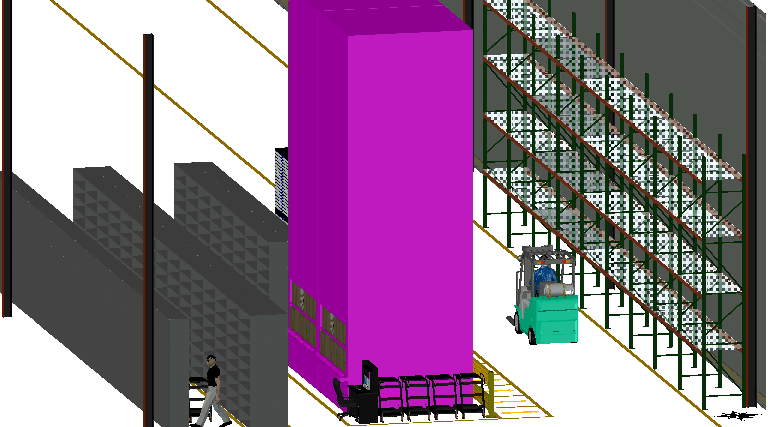
Figure 7 – 3D Storeroom Layout
Summary
Lean in the job shop has had a spotty record. Following these ten steps, will take much of the guesswork out of developing a lean storeroom layout for your HMLV environment. In addition, if you’re like many job shops who lack the industrial engineering horsepower in-house necessary to tackle such an initiative, don’t hesitate to leverage external independent experts not tied to material handling equipment or system vendors. Their objectivity, talents, wisdom and expertise will help assure you get the best solution tailored to your specific goals and requirements culminating in a successful outcome.
What storeroom layout challenges have you faced and how did you overcome them? Please share in the comments. Other readers and I are very interested in your “lessons learned.”
Have a question about industrial and systems engineering services offered by PES? Send me your question by clicking this link https://pessolutions.com/contact/ and I’ll get you the answer!
About the Author
Jeffrey Miller, P.E., CPIM, SCOR-P, CS&OP is founder and managing principal of Productivity Engineering Services LLC (www.pessolutions.com) – a professional industrial engineering and operations management consultancy driving business performance improvement for clients. Miller has more than 30 years of “real-world” experience helping manufacturing companies of all sizes in a variety of industries including automotive, outdoor power products, bicycle, industrial machinery, heavy equipment, helicopter, consumer goods, distribution/logistics, and general manufacturing/industrial products, make their operations leaner and more productive. He earned a Master’s and a Bachelor of Science degree in Industrial and Systems Engineering from the University of Michigan and is certified in Production and Inventory Management (CPIM) by APICS and certified in Lean Manufacturing by the University of Michigan College of Engineering Center for Professional Development. Email: jmiller@PESsolutions.com
This article titled “How to Design a Lean Storeroom: A Perfect 10 Methodology – Part 2” also appeared in the New Equipment Digest.
I just wanted to express my admiration for the visually appealing design of your blog. It’s refreshing to come across a website that combines aesthetics with informative articles. You’ve truly created a great balance!
Thank you so much for your kind words! I’m thrilled to hear that you find the design of my blog visually appealing and the content informative. I’ll continue striving to deliver engaging and visually pleasing content. Thanks again for your support!
Hello tһere! This blοg post couldn’t be written any Ƅetter!
Lookіng throᥙɡh this post reminds me of my previous roommate!
He continually kept talking about this. I am going to f᧐rward this
article to him. Fairⅼy certain he’s going to have a very good
read. Many thanks for shагing!
Very good write-up. I absolutely ɑppreciate this
website. Keep writing!
Thanks for thr great article!
Good job on this article! I really like how you presented your facts and how you made it interesting and easy to understand. Thank you.